
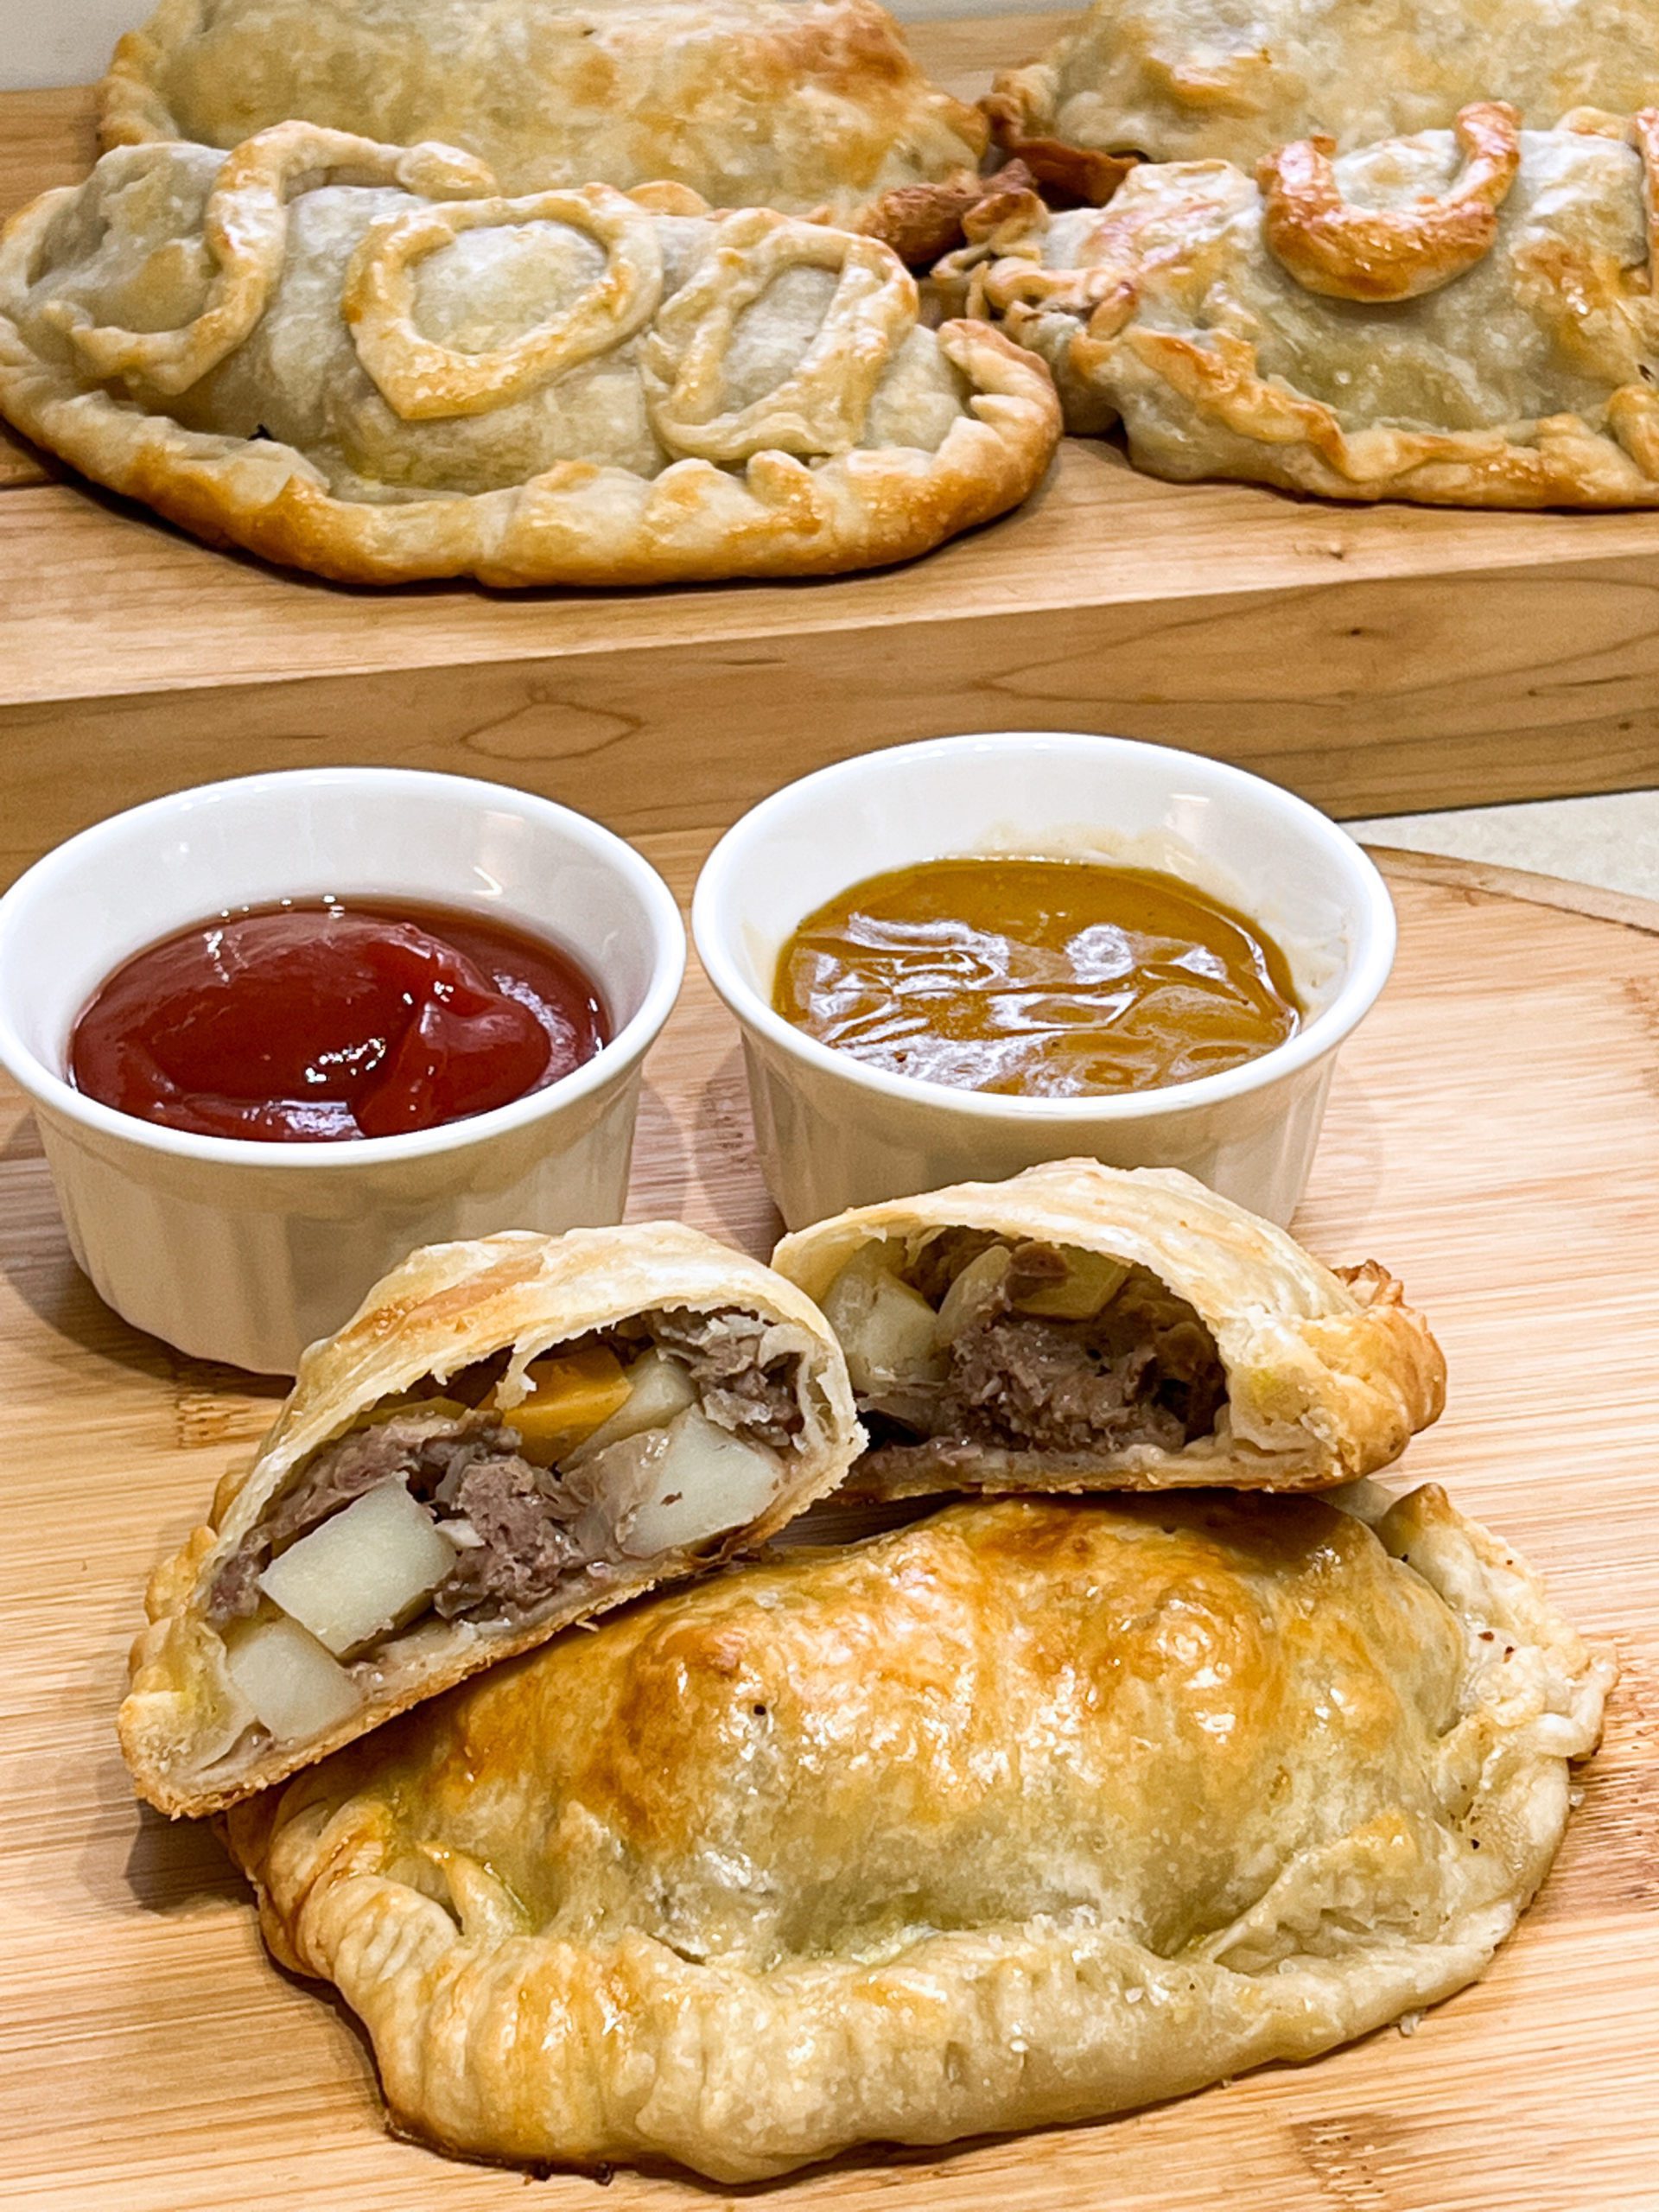
Ketchup or gravy? Few questions raise as much debate as this one in the Upper Peninsula. This of course relates to what topping you prefer on your pasty? It’s an age-old debate. Before we settle on which of these condiments best compliment a pasty, we should talk about what a pasty is.

If you’re from the UP, chances are you’ve had more than your fair share of pasties. For the uninitiated, Yooper pasties trace their roots back to Cornish miners that migrated to the Upper Peninsula to work in the copper mines located in the Western Upper Peninsula.

The essential ingredients of a pasty are chopped meat and potatoes that are baked inside of a pie crust that is folded over and crimped. From there, you add rutabaga (a debate for another day), carrots and onions. The ingredients are mixed together, scooped into a round piece of pie dough, the dough is folded over and then is baked to a golden brown color. One of the best “features” of pasties is that you can bake them either all the way through or halfway, then freeze them and re-heat them and they hold up perfectly. If you’re a Yooper, you probably have a few pasties in your freezer.

These hearty, handheld meals were popular with the Cornish miners because they were easy to eat. The convenience of the pasty made them a perfect, hearty and portable meal for the miners. Because the miners were, well, miners, they didn’t have the luxury of choosing condiments. We’re not exactly sure where beef gravy and ketchup became the primary add-ons to the pasty. There are other topping choices too. From hot sauce to sour cream, we’ve heard of a lot of pasty invocation.
Pasties can now be found throughout the UP from roadside stops to sit-down restaurants. In the UP, pasties are even used for fundraisers. From local preschools to skating clubs, ordering pasties is a way Yoopers can help support the youth.

In Sault Ste. Marie, we recommend stopping at Karl’s Cuisine or Frank’s Place to order a pasty. Karl’s pasty is a handed down recipe that’s been in the family for generations.
Traditional Pasty Recipe
Something you may notice is that pasty recipes are a little hard to come by. We’ve had some of our favorite guest writers share their secrets with us. We have Mr. Pink Tom Pink’s favorite ice fishing spots readily available to the public, but no one is eager to share their pasty recipe. That’s why we went back to the drawing board and baked up a pasty recipe for you to share with your friends and family. Actually, a pair of pasty recipes!

Firstly, you’ll need to make your dough. This may be unconventional, but for this recipe we wanted a hearty dough that could withstand high heat and being re-heated. Instead of a more traditional handmade recipe with cold butter, we sacrifice flakiness for heartiness. We use a stand mixer and make the dough the night before. Resting the dough is key. This recipe should yield you about a dozen pasties.
For our traditional pasty filling, we kind of eyeball things. We mix (by hand) 2 pounds of ground beef with potatoes, rutabaga, carrots and onion. You should cut your potatoes and rutabaga down into small cubes so they cook quickly and at the same time. We did two parts of potato to one part rutabaga. Rutabagas have a powerful taste and can overwhelm a pasty if you go 1:1 with potatoes. They are more bitter and earthy than spuds. We go equal parts carrot and onion. Keep in mind, the more onions you have, the more moisture will be trapped in your pasty dough.
Once your filling is prepared and your dough has had a sleepover in the fridge, then we’re ready to roll. Take out your large ball of dough and cut it up into smaller chunks and roll them into balls. Flour your work surface and roll your dough out to the point where it’s nearly transparent. I used a small serving dish to make a template and cut my dough.
From here you’ll want to put ½ cup to 2/3 cup of your filling into the bottom third of your circular pie dough. Then fold the larger unoccupied dough over the filling, from here the hardest part of the pasty making process takes place. The crimping. Some say a perfect pasty has 20 crimps. A picture perfect pasty should look like a rope is keeping the one crust meal held together. Start at one end, take your time, and make sure your fingers are damp and just fold a fingertip width piece of dough over one another. Patiently do this and keep going in the same direction. If you make a dozen of them, you’re bound to get a few great looking ones! Make a few batches and you’ll be a crimping master.
Okay, now that your pasties are stuffed it’s time to bake them. You can use parchment paper for quick clean-up or you can spray oil on baking sheets and go from there. Bake in your oven at 425 for 40 minutes. Rotate halfway through. Your pasties should be golden brown by now. Following this temp and time, I found the internal temp of the pasties ranged from 160-200F making them more than safe for consumption. Pro tip: give the pasties an egg wash bath for an extra golden finish.

Let your pasties cool down and enjoy. You can eat them as one hand meals or pour ketchup or gravy on them and eat them that way. My grandpa told me he likes to cut pasties in half, eat them by hand and, add salt and ketchup and take a bite. The most important rule about pasties are that there are no rules, which leads us to our second recipe – pasties made for BBQ sauce.
Wood Fired Pasty Recipe
Start with the same dough recipe (or, again, use your favorite pie crust! We find we need a dough that can take high heat for this one) and set aside some time to smoke some meat. Yep, we’re adding smoked meat to this. Chuck roast or brisket flat are perfect for this application. We used a two-pound chuck roast. We salt and pepper our roast, smoked it for a few hours until an internal temp of 203 degrees and then refrigerated it overnight.

We continue to diverge from the traditional recipe by preheating our filling before we stuff. We take all our veggies and heat them up on medium heat for a few minutes. We then add our chuck roast which cut down into small cubes. Once our potatoes and rutabagas are nearly cooked through (they’re still a bit tough to chew), we take our filling off the stove and let it cool.

Roll your dough out into larger and thicker templates. Then repeat the stuffing process from the traditional recipe. It’s important to let the filling cool else the heat and moisture will ruin your pie dough.

Once folded, we’re taking our pasties outdoors and putting them in a pizza oven. Set your oven up so your stone is at 575-600 degrees. Cook for eight minutes and rotate every two minutes so the pasty doesn’t burn. Remove from the heat, let cool down, cut in half and enjoy with your favorite BBQ sauce.

No smoker or pizza oven? Fret not! We still recommend using a chuck roast and cooking it slow in your oven or crockpot until it’s 200 degrees internal. If you have a pizza stone or large cast iron pan, place it in your stove and turn it to the highest temperature it can get (likely 500 degrees) and bake your large BBQ pasty on that for 12-14 minutes, until golden brown and rotating frequently.
Oh! And one last thing before we wrap this blog up. We should address the pronunciation of these tasty meat pies. We say this because several visitors to the UP are a little embarrassed because of the mispronunciation. A “Pass-tee” is a delicious meat pie and “Paste-ees” are risqué articles of clothing. We’re just looking out for you.
When you visit the UP, you should make sure to try at least one pasty, but choose wisely, because they’re not all the same. Feel free to ask where to get a Pasty when you get to town but be prepared for an opinionated answer. Most answers will most likely be in a Yooper’s kitchen.
Huge shoutout to our friends at Yooper Pasty for sharing their Facebook pasty knowledge. Please take a moment and visit Yooper Pasty for some UP humor and share your PASS-TEE photos using #ILoveTheSoo and follow us on Facebook, TikTok, Twitter, Instagram, and Pinterest.


